Halloween is a time for imagination to run wild, and what better way to spark creativity than by bringing favorite book characters to life? With a little cardboard, some paint, and a lot of fun, you can create unforgettable costumes right at home. This guide will walk you through how to make five fantastic DIY costumes inspired by the adventurous worlds of MamaBear Books, from the Day I Had a Series to magical unicorns.
Let's get crafting! These projects are perfect for working on together with your little ones. The goal is to have fun and make memories, so don't worry about perfection. Grab your supplies, put on some festive music, and let's create some Halloween magic.
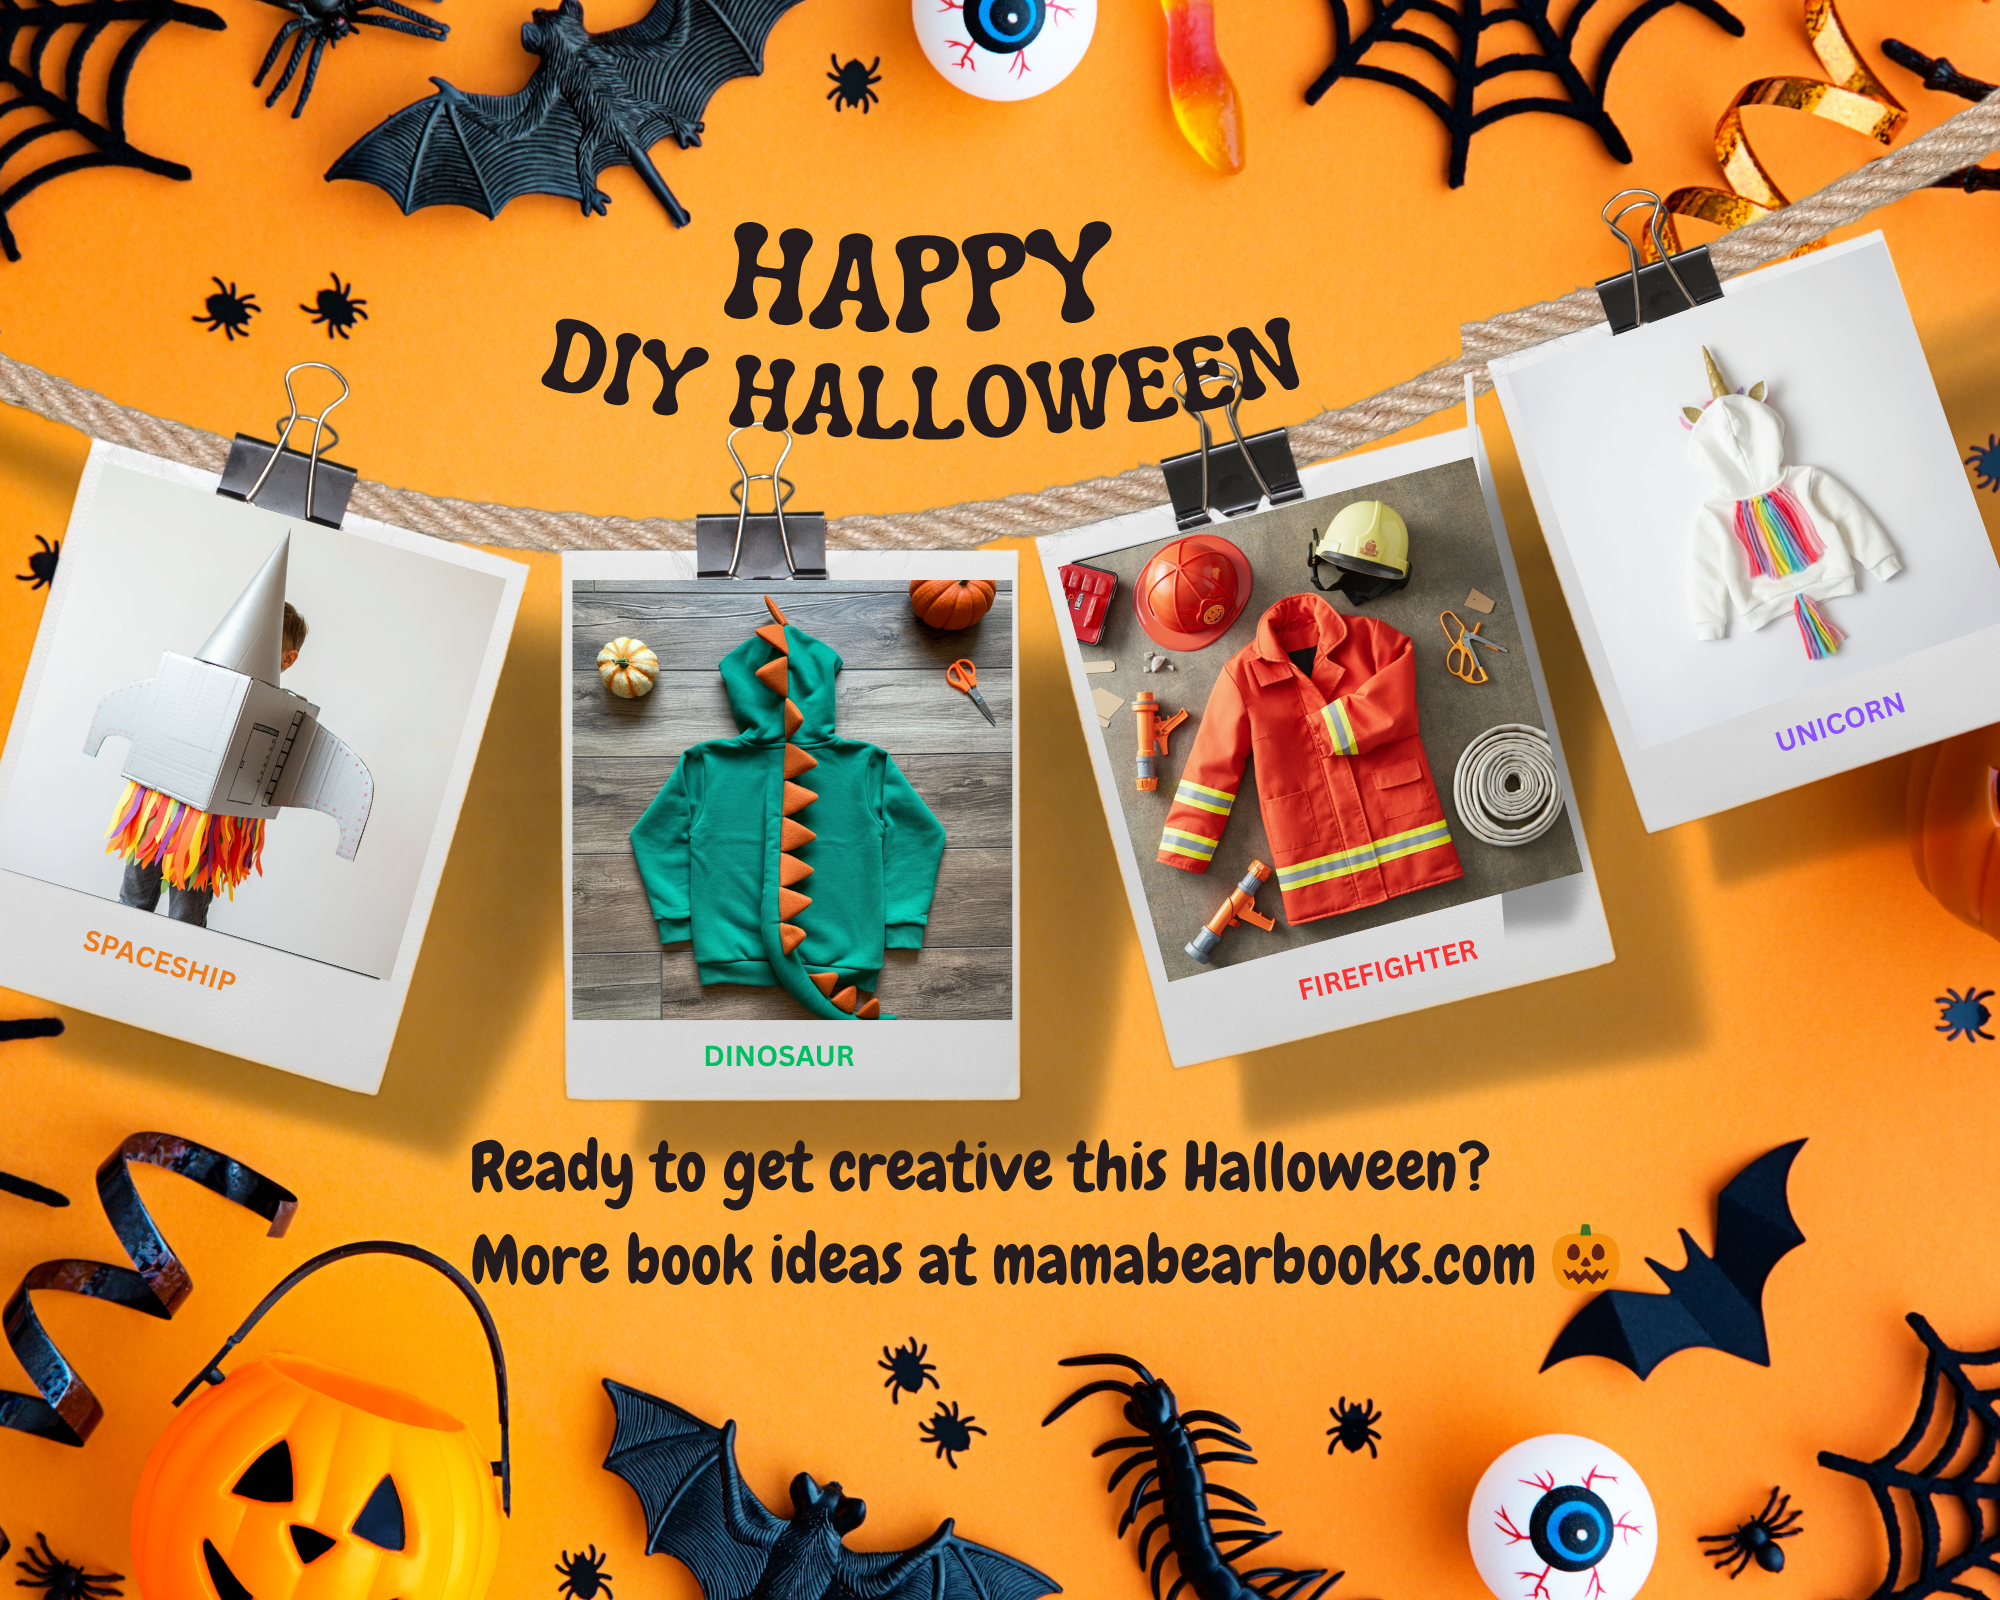
1. The Out-of-This-World Spaceship Costume
Inspired by the cosmic journeys in new book release The Day I Had a Spaceship, this spaceship costume will have your little astronaut ready for an interstellar adventure.
Materials Needed:
- Two cardboard boxes (one large enough for your child's torso, one smaller for the nose cone)
- Silver or white craft paint
- Red, yellow, and orange craft felt or construction paper
- Wide ribbon or fabric straps
- A plastic bowl or clear container
- Hot glue gun and glue sticks
- Box cutter or strong scissors
- Markers or extra paint for details
Simple Instructions:
-
Prepare the Spaceship Body: Take the large cardboard box and tape the top flaps shut. On the bottom, cut out a hole large enough for your child's head to fit through comfortably. On the two side panels, cut out armholes.
-
Create the Nose Cone: Use the smaller box to create a cone shape for the top of the rocket. You can do this by cutting and folding one corner of the box into a point and securing it with hot glue or packing tape. Glue this cone to the top of the larger box.
-
Paint the Rocket: Paint the entire cardboard structure silver or white. This may take two coats. Let it dry completely.
-
Add the Flames: Cut flame shapes out of the red, yellow, and orange felt or paper. Layer them together to create a fiery tail. Glue these flames to the inside bottom edge of the large box, so they appear to be shooting out from the rocket's base.
-
Attach the Straps: Cut two lengths of ribbon or fabric to serve as shoulder straps. Securely glue or tape them to the inside of the box, positioning them like suspenders so your child can wear the costume.
-
Finishing Touches: Glue the plastic bowl onto the front of the spaceship to create a window or porthole. Use markers or additional paint to add details like buttons, logos, or the name of your child's spaceship.
Tip: Let your child decorate their own ship! Provide stickers, glitter glue, and markers so they can personalize their cosmic ride.
2. The Heroic Firetruck Costume
Ready to answer the call of duty? This firetruck costume, straight from the pages of The Day I Had a Fire Truck, is perfect for your little hero.
Materials Needed:
- One rectangular cardboard box that your child can stand in
- Red craft paint
- Black, white, and yellow construction paper or felt
- Two paper plates
- Black marker
- Wide ribbon or fabric straps
- Hot glue gun and glue sticks
- Box cutter or scissors
Simple Instructions:
-
Build the Truck Frame: Cut off the top and bottom flaps of the cardboard box. On the top side, measure and cut out a large enough opening for your child to stand in. Leave some space at the front and back to create the "hood" and "rear" of the truck.
-
Paint it Red: Apply a vibrant coat of red paint all over the outside of the box. Let it dry completely.
-
Make the Wheels: Paint the two paper plates black. Once dry, you can add a smaller white or silver circle in the middle to look like a hubcap. Glue one wheel to each side of the truck.
-
Add the Details: Cut out squares of white paper for the windows and glue them to the front and sides. Use yellow paper to create headlights and a black marker to draw a grill on the front. You can also add a ladder to the sides using white paper strips.
-
Attach the Straps: Cut two pieces of ribbon long enough to go over your child's shoulders. Attach them securely to the front and back inner walls of the box so it can be worn like suspenders.
Tip: Complete the look with a firefighter's hat and a simple gray or black outfit underneath.
3. The Magical Unicorn Costume
Bring the sparkle of Lucy and Her Unicorn Get a Sparkle Puppy to life with this enchanting unicorn costume. It's easier than it looks and is sure to be a showstopper.
Materials Needed:
- A white or pastel-colored hooded sweatshirt and matching pants
- Stiff felt in various rainbow colors (for the mane and tail)
- Gold or silver glitter craft foam sheet (for the horn)
- White felt (for the ears)
- Stuffing (like cotton balls or poly-fil)
- Hot glue gun and glue sticks
- Scissors
Simple Instructions:
-
Create the Horn: Cut a quarter-circle shape from the glitter foam sheet. Roll it into a cone and secure the edge with hot glue. Gently stuff the horn with cotton or poly-fil to help it hold its shape. Glue the base of the horn to the top of the sweatshirt's hood.
-
Make the Ears: Cut out four teardrop shapes from the white felt. Glue two shapes together along the edges, leaving the bottom open. Turn them right-side out to create two pointed ears. Pinch the base of each ear and glue it to the hood, just behind the horn.
-
Craft the Mane: Cut long, thin strips from the various colors of rainbow felt. Gather a bunch of strips, fold them in half, and glue the folded end to the back of the hood, starting from the horn and going down the back of the sweatshirt. Continue adding bunches of felt strips to create a full, flowing mane.
-
Assemble the Tail: Take the remaining rainbow felt strips and tie them together at one end. Braid them, or leave them loose for a flowing look. Securely pin or glue the tail to the back of the pants.
Tip: Add extra sparkle with glitter glue on the sweatshirt or face glitter for a truly magical touch.
4. The Roaring Dinosaur Costume
Travel back in time with a dinosaur costume, another favorite from The Day I Had a Series. This no-sew design uses a simple hoodie as its base.
Materials Needed:
- A green or brown hooded sweatshirt and matching pants
- Stiff felt in a contrasting color (e.g., yellow, orange, or light green)
- Hot glue gun and glue sticks
- Scissors
- Stuffing (optional)
Simple Instructions:
-
Cut Out the Spikes: Draw and cut out a series of identical triangle shapes from the stiff felt. You will need enough to run from the top of the hood all the way down the back of the sweatshirt. For each spike, you'll need two triangles.
-
Assemble the Spikes: Glue two triangle pieces together along two of the three sides, leaving the bottom edge open. If you want puffier spikes, you can add a little bit of stuffing before sealing them completely, but stiff felt often holds its shape well enough on its own.
-
Attach to the Hoodie: Lay the sweatshirt flat. Apply a line of hot glue along the center seam of the hood and back. Firmly press the bottom edge of each spike onto the glue, lining them up in a neat row. Start at the top of the hood and work your way down.
-
Create a Tail (Optional): Cut a long, tapered tail shape from the same felt used for the spikes. You can stuff it and glue it together, then attach it to the back of the pants with safety pins or more hot glue.
Tip: Use white felt to add some "claws" to the cuffs of the sleeves and a few "teeth" along the edge of the hood for a fiercer look.
5. The Sweet MamaBear Costume
Inspired by the heartwarming tales in MamaBear Books, this costume is simple, cozy, and perfect for the littlest trick-or-treaters. It's all about comfort and cuteness.
Materials Needed:
- A brown or black hooded sweatshirt or onesie
- Felt in a matching brown/black and a lighter tan/pink color
- Headband (optional)
- Hot glue gun and glue sticks
- Scissors
Simple Instructions:
-
Make the Ears: From the brown or black felt, cut out two large half-circle shapes. From the lighter tan or pink felt, cut two smaller half-circle shapes. Glue the smaller shapes onto the center of the larger ones. These are your bear ears.
-
Attach to the Hood: Pinch the bottom of each completed ear and apply a dot of hot glue to hold the fold. Then, glue the ears securely onto the top of the sweatshirt hood. If using a headband, you can glue the ears to the headband instead.
-
Add the Tummy Patch: Cut a large oval out of the lighter-colored felt. Glue this onto the tummy area of the sweatshirt or onesie to create a classic teddy bear belly.
-
Finishing Touches: For a final touch, you can add a small, round felt tail to the back of the pants or onesie. A little black face paint on the nose completes the look!
Tip: This is a great parent-and-child costume idea! An adult can easily dress as MamaBear or PapaBear to accompany their little cub.
Leave a Reply